

If you have previous experience with pTools System 7 CMS as a content editor then this quick guide will highlight the main concepts and UI differences in pTools Umbraco v8.
CMS Navigation bar (Tabs)
The most commonly used tabs on the pTools system 7 CMS were Locations, Pages, Files, and Tools (Banners & Quicklinks). You will notice on the pTools Umbraco version 8 CMS that Locations, Pages, Banners and Quicklinks are all accessed via the Content tab. Files such as imagery and documents are uploaded and accessed via the Media tab.

pTools System 7 - Main navigation bar
![]()
pTools Umbraco Version 8 - Main navigation bar
The official term for the tabs at the top is "Sections" and the site structure and sitemap are "Nodes". However, for familiarity while migrating into v8, we will still use and recognise the terms "Locations" and "Pages". For example Locations may refer to the sitemap structure Nodes and Pages may refer to the webpage itself and a specific page within a node (if there are many such as News or Events).
In v8, every location of the sitemap is also its own page. Multiple pages may be created within a single location in certain circumstances like news or events, but you do not have to manually create a page after creating the location anymore.
Your user permissions will dictate what tabs in the navigation bar you see.
Content Tree Structure
Your websites sitemap will be visible within the left side tree structure under the root "Home". Depending on your website or project you may also see special locations such as Search, Login, Sitemap XML, Settings, Shared Contents, and Recycling Bin. These locations handle specific tasks and are not part of the sitemap necessarily. The tree structure is colour coded to help you identify these special locations. The icons may also help determine templates used within your sitemap.

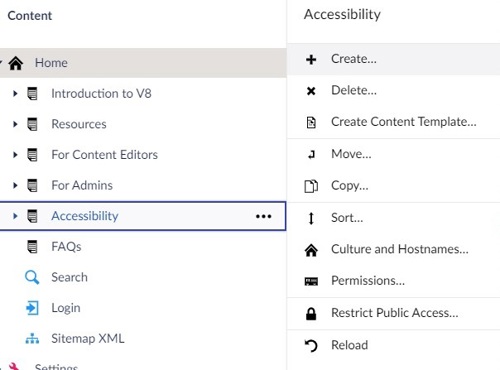
Right Click to Open Action Menu
Right clicking on a sitemap location (or other folder) will reveal the action menu for that location. Here you will be able to create new sub-locations (Pages), sort, set permissions, copy, move etc. Clicking on the three dots next to the title in the tree structure is a shortcut to creating sublocations.
Locations vs Pages
In v8, the idea of Locations and Pages is merged. Previously in System 7 you would have created a page or multiple pages within a single location. In v8 every Node in the tree structure is both a location and a page. In v8 when you are creating multiple pages of a particular location such as Latest News or Events for example, you will be creating a sublocation node on the tree structure under that News or Event location. Because we can expect a lot of pages/sublocations there is also a List View section which will display all the sublocations in a grid layout, to better scan through and select pages.
Spellchecker
The Content Editor of pTools Umbraco has a built in spell check. No more right clicking into the tinyMCE editor of system 7 for misspelled words only to see an action popup to insert tables and other editor elements.
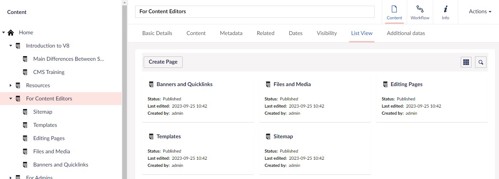
List View of Pages
Every node can expand and collapse. However, for locations where you would expect a lot of pages (therefore sublocations in the tree structure) there is a List View tab which will help display all of the sublocations/pages. With this tab you will not need to expand the location and navigate via the tree structure, instead you can find you page easily in the List View tab. The List View can also be sorted by Name, Publish Date etc.
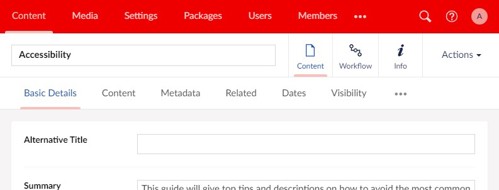
Clicking on a Sitemap Location
Clicking on the location itself will open the location. When a sitemap location is opened it will reveal the Content area by default. You will notice familiar tabs here such as the Basic Details, Content, Related, Metadata etc.
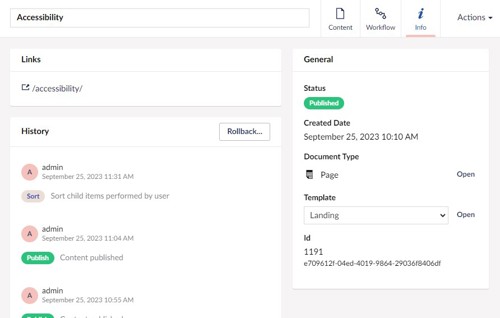
The Location's Template (Layout)
The location's layout output and purpose is determined by its Template. Changing the template will change the layout and logic behind what the location does and how it displays (e.g. a list of news articles, a gallery of images, a filter and search page etc.). By navigating to the "Info" area of a location you will see what template has been assigned. Sometimes a template could be assigned automatically (e.g. to the 2 column general template). From here you can also see the locations User History, URL, and any Redirects.
Depending on your website or project your template assigned to a location will allow for various other editable elements such as banners, quicklinks, content etc. that are not necessarily located within the location's Content or Info sections.
Files
In s7 you had a Files tab which allowed you to upload and store files directly within your sitemap locations. Sometimes you might have had a location called "Image Gallery" that was hidden. Other times you would have uploaded all of the annual reports into a location called "Annual Reports", perhaps under a "Publications" location.
In v8 all media and files are uploaded into the Media tab. You can organise this area into folders (and it would be best practise to do so) but you are not linking them in any way to your website sitemap specifically. To then have the file display in a part of your site will include further steps. There could be multiple ways that files make an appearance on your site and every site could be different. In general the most popular way to display files is to use the Related tab on something like the 2 column general template. However, how files are displayed on your website, in a file list template for example, will depend on your websites design. Refer to your template manual for more description.
Imagery Files
Images now have additional information and dimension guides as part of the uploaded file. When you click on an image file in Media you may see the various dimension requirements of your website, depending on what the image may be used for.
For example there could be a sublocation landing dimension, a carousel dimension, a hero background dimension, and a thumbnail page list dimension. Each of these will allow you to see how the image file might render for any of those use cases. No more cropping or adjusting the dimensions for every time you need to use for a particular summary image or image banner.
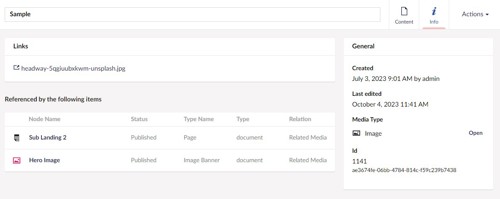
Another improvement is you will be able to see the file info, which displays every place that the image is used ("Referenced by the following items"), be it an image banner or embedded into a page or location. Click on an image file and then go to the Info section (see top right).
Banners and Quicklinks
Banners and Quicklinks are managed via a folder within the tree structure of the Content tab. They wont appear within the sitemap itself as they are not what we would describe as Locations, they are special elements. Depending on your project or website you may have sub folders within banners and quicklinks, e.g. Hero Image Banners, Landing Quicklinks, etc.

Banners and Quicklinks can be created and assigned to various webpages simultaneously in your site as normal, e.g. adding a hero image and assigning it to a particular part or webpage of your site. The exception is the Homepage template which will often have its own banners and quicklinks managed directly in its own location "Home".
Header and Footer
Header and Footer elements are also now managed in their own area of the Home location as they are universal elements. When you click on Home you will see Header and Footer tabs that will contain various elements depending on your website or project, such as logo imagery, text, and quicklinks.